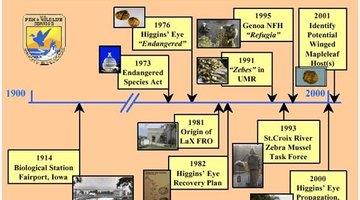
Displaying a timeline will help visually understand historical events. Organize the events in order of dates and use the dates to determine the timespan the timeline will cover. Then, after laying out the timeline, draw hatch marks to create time spans and add your events.
Planning the Timeline
A timeline is a great way to organize historical events and present them in a highly visual context that's easy to understand. However, before creating a timeline, it's important to get organized. Research the topic you wish to outline and make a list of all events and dates that must be included on the timeline. Organize the events in order of dates and use the dates to determine the timespan the timeline will cover.
Laying out the Timeline
Laying out the body of a basic timeline is a fairly simple process. First you'll need to figure out how much paper you will require. To do this, the first step is to decide what units the timeline will be broken down into. You can use months, years, decades or even centuries, but you must keep the units uniform throughout.
Once you've decided the units that you'll break the timeline down into, you can determine the length of the individual time segments. Take a look at the number of events you'd like to include in the timeline. If the timeline is information-heavy, the segments may need to be a bit longer to accommodate it all. Just like the units, the individual segment length must be uniform throughout the timeline.
Multiply the individual segment length by the number of segments to get the length of the timeline. For example, if the length of each segment is to be three inches and there will be 10 segments in the timeline, the total length of the timeline will be 30 inches. Cut out or tape together sheets of paper so that the workspace is a bit longer than the timeline itself.
Drawing the Timeline
Use a yardstick to draw the timeline on the sheet of paper. Use hatch marks to divide the timeline into the number of equal segments required.
Label each of the hatch marks according to the span of years it represents. Start with the earliest date on the left and end with the most recent date on the right.
Adding Events to the Timeline
Start with the earliest event in the first segment. Placing events on a timeline is an approximate science, but you'll want to put them about where they belong. For example, if recording an event that happened in 1925 into a segment that spans the years from 1900 to 1950, that event should go in the middle of the segment.
To place an event in a segment, use the yardstick to draw a line extending from the point in the timeline to an area either above or below that point. Label the line with the event, the date and any other information that may be pertinent.


