


Toy boats are an easy craft to make in a single afternoon. Wooden boat designs can be modified to make the same craft with cardboard. Sailboats are more difficult to create than flatboats due to the need for balancing the weight of the sails so the boat doesn’t tip over. Cardboard is easy to decorate with markers and paint before sailing. Cardboard boats can be used repeatedly when carefully waterproofed.
Easy Cardboard Toy Boat
Step 1
Cut out two cardboard rectangles 8 inches long and 4 ½ inches side. Lay the first cardboard rectangle on a flat surface with the short end facing you. Measure in 1 inch from the left edge and mark with a pen. Repeat with the right edge. Measure up 2 ½ inches from the bottom and mark with a pen. Use a ruler to draw a straight line between the marks to create a square measuring 2 ½ inches on each side. Cut out the square. There should be a one-inch flap on the right and another on the left side of the cardboard sheet.
Step 2
On the same piece of cardboard measure 4 inches up from the bottom of the cardboard sheet along the left edge and mark the spot with an X with a pen. Set the compass for a 4½-inch radius. Place the point of the compass on the X at the edge of the cardboard. Draw an arc across the opposite side and toward the top of the cardboard with the pencil end of the compass. Repeat the process on the other edge of the cardboard to create two arcs that intersect near the top of the cardboard. Cut along the arcs to create the bow of the boat.
Step 3
Place the first cardboard piece on top of the second and trace the boat shape onto the second piece of cardboard. Cut out the second piece of cardboard. Cut two strips of cardboard 8 inches long and 1 inch wide. Cut two small sqaures, each 1 inch long and 1 inch wide. Cut three cardboard strips 2 ½ inches long and 1 inch wide. Cut a cardboard strip 3 inches long and 1 inch wide. Use markers or paint to decorate the cardboard pieces before continuing.
Step 4
Set one boat template on a flat surface with the bow facing away from you. Stand one of the 8-inch-long cardboard strips on top of the long edge of the boat and tape in place. Repeat with the other 8-inch strip of cardboard on the other long edge of the boat. Add tape around the bow to hold the two strips firmly together. Stand the 1-inch strips along the back of the flaps on the boat and tape in place. Apply the 2-½ inch strips around the square insert of the boat and tape in place. Apply tape at each corner to add strength. When all sides have been put in place add glue along the seam around the inside of the boat. Set aside to dry.
Step 5
Set the second boat template on top of a piece of plastic wrap that is at least 10 inches long and 6 inches wide. Measure 1½ inches out from each edge of the template and mark with a pen. Cut the plastic wrap out along these marks to create a boat shape that is larger than the template. Wrap the plastic wrap up and around the cardboard bottom and sides of the boat, wrapping the edges into the inside of the boat. Cut a second piece of plastic wrap ½ inch larger than the boat template and wrap it around the other cardboard piece that will make the top of the boat. Glue plastic wrap in place as necessary. Set the 3-by-1-inch piece of cardboard on a sheet of aluminum foil. This piece will be the paddle. Cut a piece of aluminum foil large enough to cover the paddle twice. Cover the paddle with the aluminum foil and glue the edges of the foil shut to seal them.
Step 6
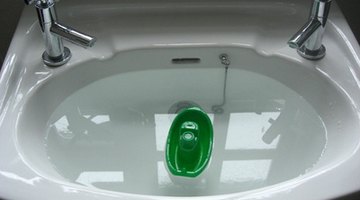
Apply glue along the top of the walls of the boat and set the second cardboard boat template on top. Press in place. Allow the glue to dry completely. Stretch the rubber band across the back of the boat without twisting it. Insert the paddle between the flaps of the boat and between the rubber band edges. Turn the paddle to make the rubber band twist on either side of the paddle. Set the boat in the water and release the paddle. The rubber band will unwind, and the boat will move forward.
Tip
The paddle should be light enough to float rather than sink when it has finished spinning.
Related Articles


Tips
- The paddle should be light enough to float rather than sink when it has finished spinning.
Writer Bio
Based in Minneapolis, Dawn Marcotte has been writing for more than 10 years. Her recent writing has turned to nonfiction and includes articles on home and garden, education, crafts and automotive subjects. She currently has several eBooks published and available online. Marcotte has a Bachelor of Science in elementary education from the University of Iowa.